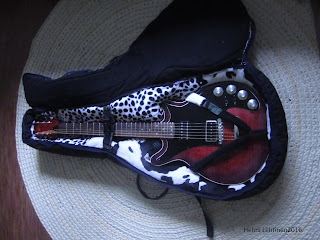
For the last few days I've spend time making a gig-bag for my first build. Because of the extra thick padding, it included a lot of sewing by hand.
I decided to make the bag myself because I don't have too much money to spend and soon I'll have to buy many things I need when I move out. I have received fabric meant for furniture and packaging from my uncle, for free, so the total cost ended up being just 6€ instead of, say 50€! :)
I started by a little planning for construction in my head. Then I took the guitar and put it on the padding sheet (I already had them from former projects) and drew the shape of the guitar on it. Then I added a bit extra room to the sides for more padding and cut it out. I needed to cut several pieces of both fabric and padding material.
The layers:
 |
| The back. Not completely done. |
The back
-outer fabric
-one coat of padding
-plastic "shielding" made of used (clean) plastic bags to prevent water getting to damage my guitar.
-three more coats of padding
-inner fabric
The top
-outer fabric
-plastic "shielding"
-2 layers of padding
-one layer fabric
-2 cm thick foam rubber cut in the shape of the guitar
-inner fabric (fleece)
 |
| The inside. Not really loving the color.. Well that´s the softest I got. It´s leftover from a hobbyhorse project years and years ago. |
-outer fabric
-plastic shielding
-lots of cotton wool.
-3 cm thick rubber foam, bent in the shape of the guitar by sewing it to the back.
-inner fabric
I also made two pockets on the top, with plastic lining, too, for carrying for example the strap, plug wire, capo, slide, picks, spare strings etc.
It has back bag straps and side handles for carrying. The top is closed onto the bag with a 170 cm long hard-duty zipper, sewn on by hand.
In the beginning and when making the top I was able to machine sew, but once I had put enough padding, it was too heavy for the machine and I had to sew by hand. Luckily I own a curve needle which is specially made for furniture etc.
The inner lining I attached by hand, too. Just to make sure the guitar doesn't slip out of the bag in case of zipper tearing, I made two safety straps inside: for the neck and v-shaped for the body.
 |
| And here with the guitar in! Here you can see the safety belts. Nice ´n comfty for my guitar! |
I'm really happy about this project, especially for the total cost of 6€!
Sometime I'll post some epic fails, too.. Maybe just not to start with.. ;)
Thanks for reading! It's vacation time so I'm trying to make new post daily. Feel free to ask your questions and writing comments! Use the comment form below or email me for more specific questions at craftsmanmusical6@gmail.com !
For next post I'm planning on making a Vox amPlug review! So look forward to that and don't forget to check out my other post as well!
SEE YOU THEN!

No comments:
Post a Comment